FreeBSDにApacheをインストールして起動
さくらの VPS でマルチプレイ用 Minecraft サーバーを立てる
手順
- root でログイン,不要なデーモン (マイクラサーバーを運用していく上で特に使用しないサービス) をOFFにする.
最後に再起動して設定を反映させる.$ chkconfig auditd off $ chkconfig haldaemon off $ chkconfig lvm2-monitor off $ chkconfig mdmonitor off $ chkconfig messagebus off $ chkconfig netfs off $ chkconfig restorecond off $ chkconfig smartd off $ reboot
これを実施することで CentOS 自体のメモリ使用量が 500MB 超から 100MB 程度になりました.
$ free
             total       used       free     shared    buffers     cached
Mem:       1020580      97964     922616          0       6972      32868
-/+ buffers/cache:      58124     962456
Swap:      2097144          0    2097144
マイクラサーバーを起動した状態でこんな感じ.
$ free total used free shared buffers cached Mem: 1020580 327952 692628 0 8012 57524 -/+ buffers/cache: 262416 758164 Swap: 2097144 0 2097144 - Java をインストール.
JDK のリンクは Oracleのサイト から入手可能です.$ wget http://download.oracle.com/otn-pub/java/jdk/7u9-b05/jdk-7u9-linux-x64.rpm?AuthParam=1354713154_7cab191ee6d836452cd9d23a0bc74f65 $ mv jdk-7u9-linux-x64.rpm?AuthParam=1354713154_7cab191ee6d836452cd9d23a0bc74f65 jdk-7u9-linux-x64.rpm $ sudo rpm -ivh ./jdk-7u9-linux-x64.rpm
- screen をインストール.
$ sudo yum install screen
- Minecraft Server をダウンロード.
ホームディレクトリにマイクラサーバー用のフォルダを作成し,その中にサーバー本体をダウンロードします.$ cd ~ $ mkdir minecraft $ cd minecraft $ wget https://s3.amazonaws.com/MinecraftDownload/launcher/minecraft_server.jar $ wget -O minecraft "http://www.minecraftwiki.net/wiki/Tutorials/Server_startup_script/Script?action=raw" $ chmod a+x ./minecraft
- Minecraft Server を起動.
$ ./minecraft start
- Minecraft Server を停止.
$ ./minecraft stop
UIAlertViewのボタンが押された時の処理
手順
ViewController.h
#import <UIKit/UIKit.h>

@interface ViewController : UIViewController <UIAlertViewDelegate>

@end
ViewController.m
#import "ViewController.h"

@interface ViewController ()

@end

@implementation ViewController

// いろいろ省略

- (void)viewDidLoad
{
    // デリゲートをselfにセットします
    // cancelButtonTitle,otherButtonTitlesを設定
    UIAlertView *alert = [[UIAlertView alloc] initWithTitle:@"アラートのタイトル" message:@"アラート本文" delegate:self cancelButtonTitle:@"いいえ" otherButtonTitles:@"まあまあ", @"はい", nil];
    [alert show];
}

- (void)alertView:(UIAlertView *)alertView clickedButtonAtIndex:(NSInteger)buttonIndex
{
    switch (buttonIndex) {
        case 0:
            // 1番目のボタン「いいえ」が押されたとき
            break;
        case 1:
            // 2番目のボタン「まあまあ」が押されたとき
            break;
        case 2:
            // 3番目のボタン「はい」が押されたとき
            break;
        default:
            break;
    }
}

@end
カメラ, カメラロール, フォトアルバムから画像を選択してメール添付する
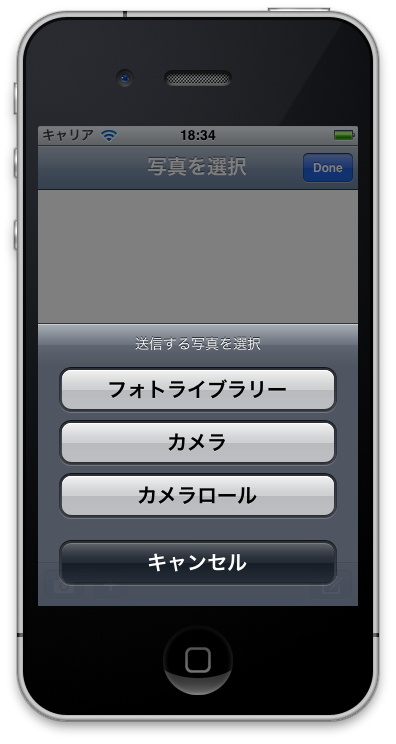
アクションシートを利用して画像をどこから(カメラ,カメラロール,フォトアルバム)選択するかというのと,選択した画像をメールに添付して送信するというのを実装してみます.
手順
Interface BuilderやStoryboadにて適当にボタンを2つ作成,それぞれのIBActionをビューコントローラーのクラスのヘッダーファイルに割り当てておく.
今回はStoryboadにてボタンを2つ作成し,PhotoSelectViewControllerというUIViewControllerクラスを継承したクラスのヘッダーファイルにAction(pressedCameraButton, pressedComposeButton)を割り当てた.
PhotoSelectViewController.h
#import <UIKit/UIKit.h>

@interface PhotoSelectViewController : UIViewController <UIActionSheetDelegate>

@property (strong, nonatomic) UIImage *image;

- (IBAction)pressedCameraButton:(id)sender;
- (IBAction)pressedComposeButton:(id)sender;

@end
PhotoSelectViewController.m
#import "PhotoSelectViewController.h"
#import <MessageUI/MessageUI.h>

@interface PhotoSelectViewController ()

@end

@implementation PhotoSelectViewController

// 省略

- (IBAction)pressedCameraButton:(id)sender {

    UIActionSheet *sheet = [[UIActionSheet alloc]
             initWithTitle:@"送信する写真を選択"
             delegate:self
             cancelButtonTitle:@"キャンセル"
             destructiveButtonTitle:nil
             otherButtonTitles:@"フォトライブラリー", @"カメラ", @"カメラロール", nil];
    [sheet showInView:self.view];
}

- (IBAction)pressedComposeButton:(id)sender {

    MFMailComposeViewController *mailComposeViewController = [[MFMailComposeViewController alloc] init];
    // メールの送信・キャンセルをデリゲートで受け取るためにセット
    [mailComposeViewController setMailComposeDelegate:self];
    [mailComposeViewController setToRecipients:[NSArray arrayWithObject:@"example@example.com"]];
    [mailComposeViewController setMessageBody:@"メールの本文" isHTML:NO];

    // _imageのnilチェック
    if (_image){
        // 圧縮率
        CGFloat compressionQuality = 0.8;
        // UIImageJPEGRepresentationでJPEG圧縮
        NSData *attachData = UIImageJPEGRepresentation(_image, compressionQuality);
        // 圧縮した画像を添付
        [mailComposeViewController addAttachmentData:attachData
                                            mimeType:@"image/jpeg"
                                            fileName:@"image.jpg"];
    }

	[self presentModalViewController:mailComposeViewController animated:YES];
}

// アクションシートのデリゲートメソッド(アクションシートのボタンが押された時の処理)
- (void)actionSheet:(UIActionSheet*)actionSheet clickedButtonAtIndex:(NSInteger)buttonIndex {

    UIImagePickerControllerSourceType sourceType;
    UIImagePickerController *ipc;

    switch (buttonIndex) {
        case 0:
            // フォトライブラリーを表示
            sourceType = UIImagePickerControllerSourceTypePhotoLibrary;
            if (![UIImagePickerController isSourceTypeAvailable:sourceType]) {
                UIAlertView *alert = [[UIAlertView alloc] initWithTitle:@"エラー" message:@"フォトライブラリーを表示できません" delegate:nil cancelButtonTitle:@"OK" otherButtonTitles:nil];
                [alert show];
                return;
            }

            ipc = [[UIImagePickerController alloc] init];
            [ipc setSourceType:sourceType];
            [ipc setDelegate:self];
            [self presentModalViewController:ipc animated:YES];
            break;

        case 1:
            // カメラを起動
            sourceType = UIImagePickerControllerSourceTypeCamera;
            if (![UIImagePickerController isSourceTypeAvailable:sourceType]) {
                UIAlertView *alert = [[UIAlertView alloc] initWithTitle:@"エラー" message:@"カメラを起動できません" delegate:nil cancelButtonTitle:@"OK" otherButtonTitles:nil];
                [alert show];
                return;
            }

            ipc = [[UIImagePickerController alloc] init];
            [ipc setSourceType:sourceType];
            [ipc setDelegate:self];
            [self presentModalViewController:ipc animated:YES];
            break;

        case 2:
            // カメラロールを表示
            sourceType = UIImagePickerControllerSourceTypeSavedPhotosAlbum;
            if (![UIImagePickerController isSourceTypeAvailable:sourceType]) {
                UIAlertView *alert = [[UIAlertView alloc] initWithTitle:@"エラー" message:@"カメラロールを表示できません" delegate:nil cancelButtonTitle:@"OK" otherButtonTitles:nil];
                [alert show];
                return;
            }

            ipc = [[UIImagePickerController alloc] init];
            [ipc setSourceType:sourceType];
            [ipc setDelegate:self];
            [self presentModalViewController:ipc animated:YES];
            break;

        default:
            break;
    }
}

// アクションシートのデリゲートメソッド(画像を選択したあとの処理)
- (void)imagePickerController:(UIImagePickerController *)picker didFinishPickingMediaWithInfo:(NSDictionary *)info {

    UIImage *image = [info objectForKey:UIImagePickerControllerOriginalImage];
    _image = image;

    if ([picker respondsToSelector:@selector(presentingViewController)]) {
        [[picker presentingViewController] dismissModalViewControllerAnimated:YES];
    } else {
        [[picker parentViewController] dismissModalViewControllerAnimated:YES];
    }
}

@end
Mac OS Xの“Web共有”でPHPやCGIを有効にする
手順
- /etc/apache2/httpd.conf の以下の行のコメントアウトを外す.
#LoadModule php5_module libexec/apache2/libphp5.so - /etc/apache2/users/${USERNAME}.conf
<Directory "/Users/USERNAME/Sites/">
Options Indexes MultiViews
AllowOverride None
Order allow,deny
Allow from all
</Directory>
このようになっているので,以下のように適宜書き加える.
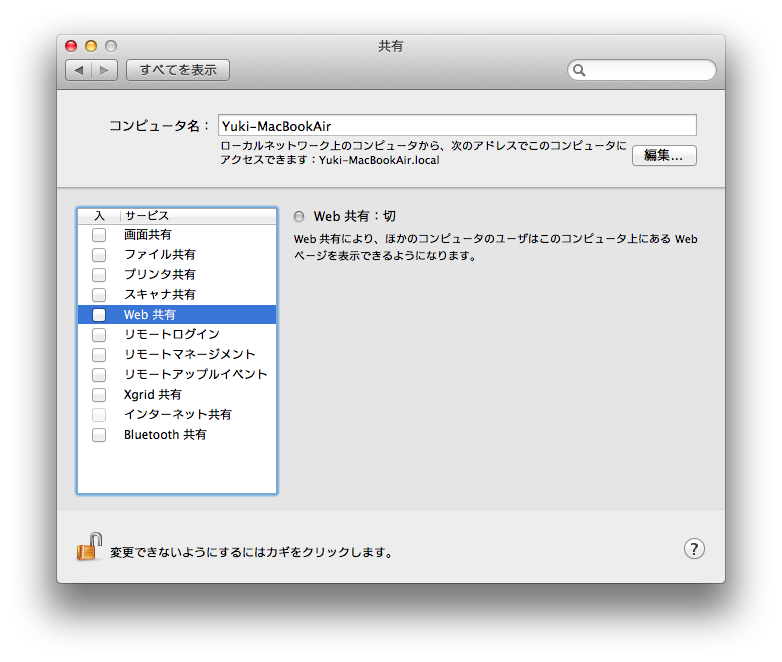
<Directory "/Users/USERNAME/Sites/"> AddHandler cgi-script .cgi Options Indexes MultiViews Includes ExecCGI AllowOverride None Order allow,deny Allow from all </Directory> - システム環境設定 → 共有 とたどって「Web共有」を一旦無効にして再度有効化.

UICollectionViewを実装する
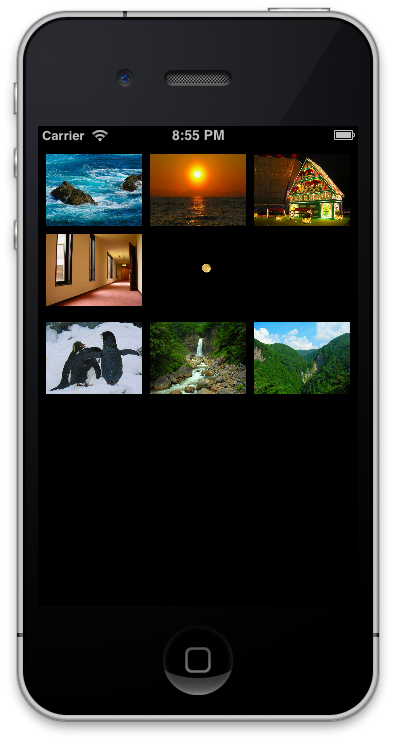
iOS 6から追加されたUICollectionViewという,グリッド表示の実装を容易にしたものを使ってみようと思います.iOS 6から追加されたものなので,一般向けのアプリの中で使えるようになるのはもう少し先のことでしょうかね.
今回はアプリを開いて最初に出てくるViewControllerをUICollectionViewControllerとするアプリを例として作ってみます.
実装
AppDelegate.h
実装側でUICollectionViewControllerを初期画面としてセットするために,プロパティの“viewController”のクラスを“ViewController”からより汎用性の高い“UIViewController”に変更しておきます.
#import <UIKit/UIKit.h>

@class ViewController;

@interface AppDelegate : UIResponder <UIApplicationDelegate>

@property (strong, nonatomic) UIWindow *window;
@property (strong, nonatomic) UIViewController *viewController;

@end
AppDelegate.m
UICollectionViewControllerのレイアウトを作って初期化時に渡してあげます.
(今回は“UICollectionViewFlowLayout”を利用しました)
#import "AppDelegate.h"

#import "CollectionViewController.h"

@implementation AppDelegate

- (BOOL)application:(UIApplication *)application didFinishLaunchingWithOptions:(NSDictionary *)launchOptions
{
    self.window = [[UIWindow alloc] initWithFrame:[[UIScreen mainScreen] bounds]];

    // Override point for customization after application launch.
    UICollectionViewFlowLayout *layout = [[UICollectionViewFlowLayout alloc] init];

    // セルのサイズ
    layout.itemSize = CGSizeMake(96, 72);
    // セクションごとのヘッダーのサイズ
    layout.headerReferenceSize = CGSizeMake(0, 0);
    // セクションごとのフッターのサイズ
    layout.footerReferenceSize = CGSizeMake(0, 0);
    // 行ごとのスペースの最小値
    layout.minimumLineSpacing = 8.0;
    // アイテムごとのスペースの最小値
    layout.minimumInteritemSpacing = 8.0;
    // セクションの外枠のスペース
    layout.sectionInset = UIEdgeInsetsMake(8, 8, 8, 8);

    UIViewController *collectionViewController = [[CollectionViewController alloc] initWithCollectionViewLayout:layout];

    // 初期画面としてcollectionViewControllerをセット
    self.viewController = collectionViewController;

    self.window.rootViewController = self.viewController;
    [self.window makeKeyAndVisible];
    return YES;
}

- (void)applicationWillResignActive:(UIApplication *)application {}
- (void)applicationDidEnterBackground:(UIApplication *)application {}
- (void)applicationWillEnterForeground:(UIApplication *)application {}
- (void)applicationDidBecomeActive:(UIApplication *)application {}
- (void)applicationWillTerminate:(UIApplication *)application {}

@end
CollectionViewController.h
表示するセルのアイテムを配列として宣言しておきます.
多次元配列として利用し,行をセクション数,列をアイテム数として後ほどカウントします.
#import <UIKit/UIKit.h>

@interface CollectionViewController : UICollectionViewController

@property (strong, nonatomic) NSArray *array;

@end
CollectionViewController.m
#import "CollectionViewController.h"

@interface CollectionViewController ()

@end

@implementation CollectionViewController

- (id)initWithNibName:(NSString *)nibNameOrNil bundle:(NSBundle *)nibBundleOrNil
{
    self = [super initWithNibName:nibNameOrNil bundle:nibBundleOrNil];
    if (self) {
        // Custom initialization
    }
    return self;
}

- (void)viewDidLoad
{
    [super viewDidLoad];
    // Do any additional setup after loading the view.

    // 画像を読み込んで配列に格納
    NSMutableArray *photo1 = [NSMutableArray array];

    for (int i = 1; i <= 5; i++) {
        UIImage *img = [UIImage imageNamed:[NSString stringWithFormat:@"img0%d.jpg", i]];
        [photo1 addObject:img];
    }

    NSMutableArray *photo2 = [NSMutableArray array];

    for (int i = 1; i <= 3; i++) {
        UIImage *img = [UIImage imageNamed:[NSString stringWithFormat:@"img1%d.jpg", i]];
        [photo2 addObject:img];
    }

    self.array = @[photo1, photo2];

    // collectionViewにcellのクラスを登録
    [self.collectionView registerClass:[UICollectionViewCell class] forCellWithReuseIdentifier:@"CollectionViewCell"];
}

- (void)didReceiveMemoryWarning
{
    [super didReceiveMemoryWarning];
    // Dispose of any resources that can be recreated.
}

- (NSInteger)numberOfSectionsInCollectionView:(UICollectionView *)collectionView {
    // セクション数をカウント
    return [self.array count];
}

- (NSInteger)collectionView:(UICollectionView *)view numberOfItemsInSection:(NSInteger)section {
    // セクション内のアイテム数をカウント
    return [[self.array objectAtIndex:section] count];
}

- (UICollectionViewCell *)collectionView:(UICollectionView *)collectionView cellForItemAtIndexPath:(NSIndexPath *)indexPath {

    UICollectionViewCell *cell = [collectionView dequeueReusableCellWithReuseIdentifier:@"CollectionViewCell" forIndexPath:indexPath];

    UIImageView *imgView = [[UIImageView alloc] initWithImage:[[self.array objectAtIndex:indexPath.section] objectAtIndex:indexPath.item]];
    imgView.frame = CGRectMake(0.0, 0.0, 96.0, 72.0);

    // cellにimgViewをセット
    [cell addSubview:imgView];

    return cell;
}


@end
第2回 AndroiderのためのiOS勉強会に参加してきました
実は今年の夏に開催された 第1回 AndroiderのためのiOS入門勉強会 も参加していたわけですが,第2回が開かれるということで参加してきました.このシリーズの勉強会では本当に濃い時間が作れてて何があっても行きたいと思いますね.

